


It’s almost guaranteed, but if you’ve got an older Windows computer, you’re probably low on disk space. And unfortunately for you, a hard drive with little to no space will be a drag on your computer. Inevitably it’ll slow down and your apps will freeze and crash more frequently, making your PC difficult and frustrating to use.


The fix is obvious — you need to clean up your drive — but you may have a difficult time deciding exactly which files to get rid of. Fortunately, Windows 11 makes it easy to delete the files that you don’t need and free up some space on your computer.
Instead of downloading third-party software to free up disk space, Windows 11 has a few settings you can configure to quickly delete temporary, system files and old downloads you might not need.
And if you’re worried about getting rid of important files, don’t fret — Windows 11 will help you decide what to get rid of to improve your PC’s performance.
If you want to learn more, check out more features we love on Windows 11. You should also read about the best desktop computers this year.
How to automatically free up storage space on Windows 11
On your Windows 11 computer, go to Settings > System > Storage. If this is your first time visiting this setting, wait a few seconds for your computer to analyze your data storage. Once Windows has collected what it needs to know, you’ll be able to see your total free memory at the top of the page. Underneath that you’ll see a breakdown of your storage, divided into apps and features, temporary files and other. You can also click Show more categories to view a further breakdown.
The setting we’re interested in, however, is Storage Sense, which automatically frees up space on your computer whenever your disk space is low. It does this by deleting temporary files, emptying your Recycle Bin and getting rid of old downloads, in the background, without you having to manually do it.

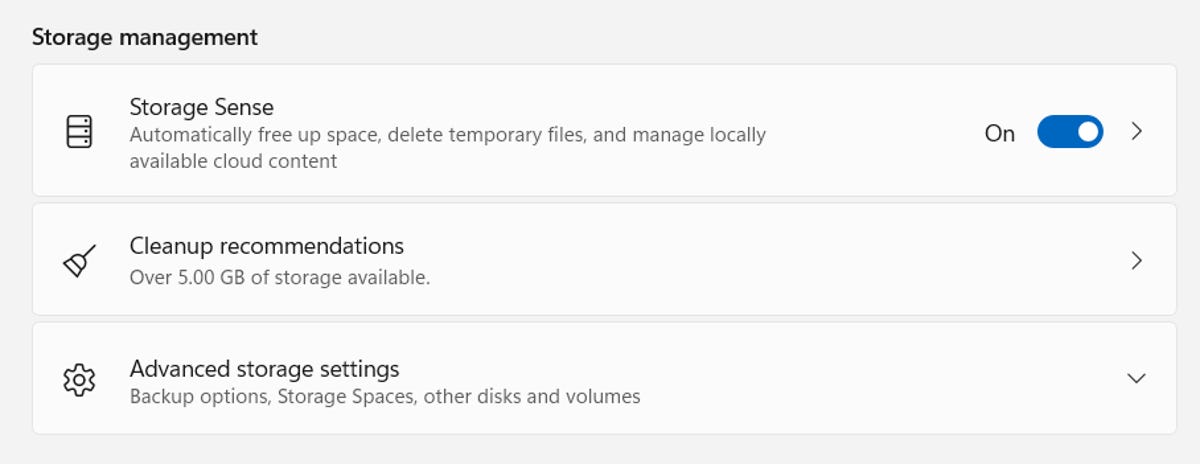
To turn on Storage Sense, simply toggle it on here. If you click the setting, you can configure several features:
- Run Storage Sense: Run Storage Sense during low disk space (default) or every day, week or month.
- Delete files in my recycle bin if they have been there for over: Choose 1 day, 14 days, 30 days (default) or 60 days.
- Delete files in my Downloads folder if they haven’t been opened for more than: Choose never (default), 1 day, 14 days, 30 days or 60 days.
These Storage Sense settings can help you limit which files are removed, and when they’re removed, so that you don’t have to worry about any important files getting wiped from your computer.

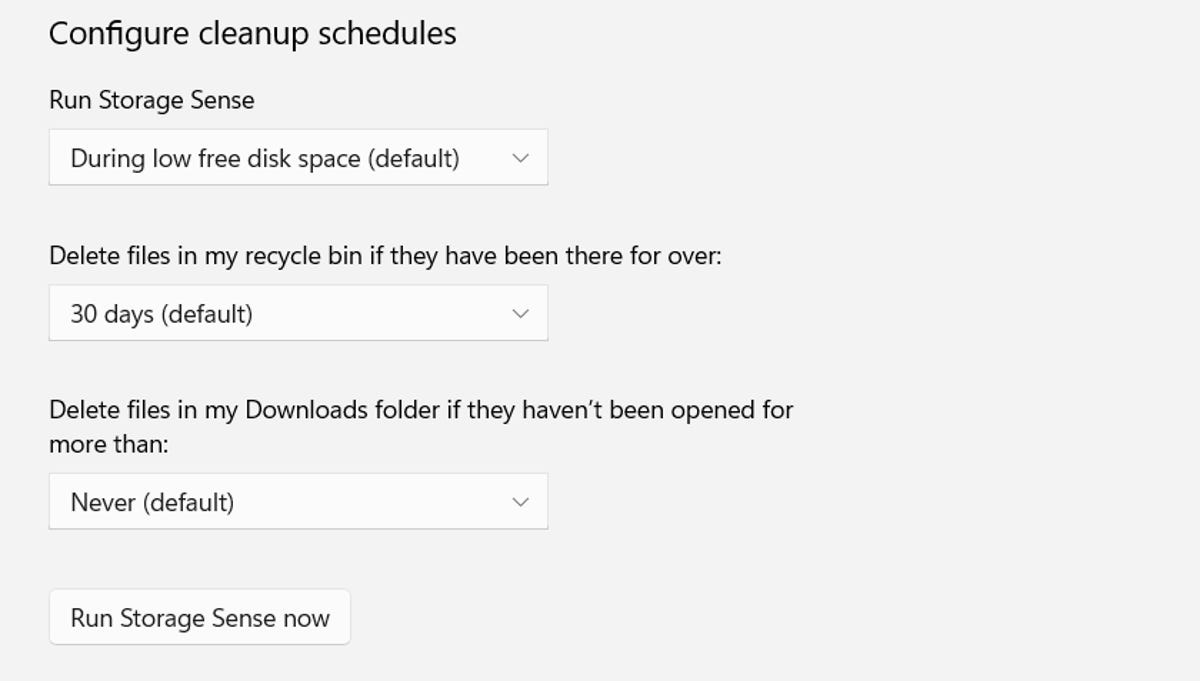
At the bottom of the page, you can click Run Storage Sense now to use the feature then and there.
And if you want to get rid of more files to clear up space, use the Cleanup recommendations feature underneath Storage Sense. If you click on it, it will scan your system and recommend files for you to manually delete, such as temporary files, large or unused files, files synced with your cloud and unused apps.
Want to learn more about Windows 11? Check out the biggest differences between Windows 10 and Windows 11. Also, these are the best features on Windows 11 you need to know about. And if you haven’t downloaded Windows 11 yet, here’s how what you need to do.